Learn about Ford Explorer (UN105/150; 1995-1997) fuse box and relay’s locations, functions, and maintenance tips for optimal vehicle electrical system.
If your 1995-1997 Ford Explorer has a dead radio, non-functioning power windows, or headlights that won’t turn on, a blown fuse or faulty relay is often the reason. Before assuming the worst, learning where your Explorer’s fuse boxes are located can help you quickly diagnose and often resolve, these common electrical issues yourself.
Fuses and relays are fundamental safety components in your vehicle’s electrical system. Fuses are designed to blow when a circuit draws excessive current, protecting wiring and electrical components from damage or potential fire hazards. Relays act as electrically controlled switches, using a low-current signal to operate higher-powered systems like your headlights, cooling fan, or fuel pump.
For owners of this first-generation Ford Explorer, understanding fuse box and relay locations is especially valuable since these older vehicles may require more frequent troubleshooting due to age-related wear on electrical connections. This guide covers exactly where to find your Explorer’s fuse boxes and how to access them safely.
MUST READ: DYI – How to Check Car Fuses?
(1995-1997) Ford Explorer UN105/150 fuse box and relay with Diagram
WARNING
- Never replace a fuse with one that has a higher amperage rating.
- A fuse with a too-high amperage could damage the electrical part and cause a fire.
- On no account should fuses be repaired (e.g. patched up with tin foil or wire) as this may cause serious damage elsewhere in the electrical circuit or cause a fire.
- If a fuse blows repeatedly, do not keep replacing it. Instead, have the cause for the repeated short circuit or overload tracked and fixed.
- Terminal and harness assignments for individual connectors will vary depending on vehicle equipment level, model, and market.
Ford Explorer (UN105/150; 1995-1997) fuse assignment
Ford Explorer UN105/150 Year of production: 1995, 1996, 1997
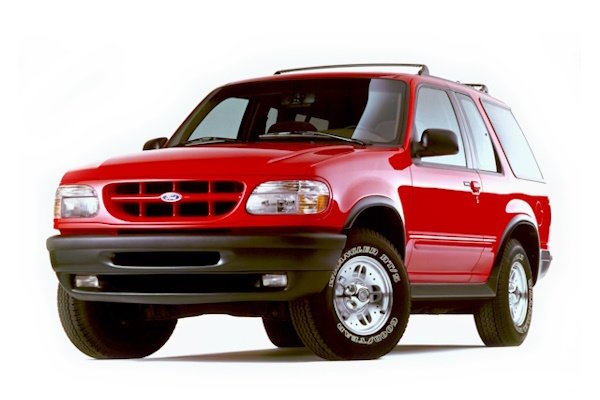
Fuse Box Locations in the 1995-1997 Ford Explorer
This generation of the Ford Explorer features a simpler electrical layout compared to later models, with two primary fuse box locations: one under the hood and one inside the cabin.
Engine Compartment Fuse Box
The engine bay fuse box, also known as the Power Distribution Box, is located near the battery on the driver’s side of the engine compartment. This box houses higher-amperage fuses and relays that control systems such as the headlights, engine cooling fan, and horn.
To access this fuse box, make sure the engine is off and the ignition key is removed. Look for a black plastic cover secured with clips or tabs along the edges, sometimes with a couple of retaining screws depending on your specific trim. Unclip or unscrew the cover and lift it straight up to reveal the fuses and relays inside. A diagram identifying each component is typically printed on the underside of the cover itself.
Interior Fuse Box (Passenger Compartment)
The interior fuse panel is located inside the cab, under the dashboard on the driver’s side, generally to the left of the steering column near the kick panel. This fuse box manages cabin electrical systems including the radio, interior lighting, power windows, and dashboard instrumentation.
To access it, sit in the driver’s seat and look beneath the dash near your left knee. On this generation of Explorer, the panel cover is often a simple flip-down or snap-off design, sometimes without screws at all. Once open, you’ll see the fuse layout along with a diagram printed on the inside of the cover or nearby, helping you identify which fuse corresponds to which system.
How to Safely Access and Work with Fuses and Relays
Safety should always come first when working with your Explorer’s electrical system. Turn off the ignition and remove the key before opening either fuse box. Given the age of these vehicles, it’s also wise to disconnect the negative battery terminal before doing any extended electrical work, as older wiring and connectors can be more prone to accidental shorts.
When removing a fuse, use a plastic fuse-puller tool if available, or a small pair of non-conductive tweezers if the original tool is missing. Avoid using metal tools like screwdrivers or pliers, as these can cause sparks or short circuits if they accidentally bridge multiple terminals.
Relays in this generation of Explorer are plugged into sockets rather than clipped into place. To remove one, gently rock it side to side while pulling upward to avoid bending the connector pins. Since these vehicles are decades old now, relays and their sockets may be more brittle, so handle them with extra care to avoid cracking the plastic housing.
Identifying the Right Fuse or Relay
Each fuse and relay in your Explorer’s fuse boxes is labeled with a number or letter that corresponds to a printed diagram, usually found on the fuse box cover or in your owner’s manual. This diagram tells you exactly which fuse or relay controls which component, from your power mirrors to your dashboard lighting.
Before removing any fuse, cross-reference the diagram with the physical fuse box to confirm you’re pulling the correct one. This step is especially important on older vehicles, where fuse labeling can sometimes be worn or faded after years of use.
A blown fuse is generally easy to identify, look for a discolored appearance or a visibly broken metal strip inside the fuse. Always replace a blown fuse with one of the same amperage rating. Using a higher-rated fuse can damage your Explorer’s wiring and create a fire risk, so it’s important to match the replacement exactly, even on an older vehicle.
Checking and Replacing Fuses in Ford Explorer
Fuses protect your vehicle’s electrical system from overloading. If electrical parts in your vehicle are not working, the system may have been overloaded and blown a fuse. Before you replace or repair any electrical parts, check the appropriate fuses. If a fuse blows, all the parts of your vehicle that use that circuit will not work.
If you need to check a fuse, follow these steps:
- Find the fuse panel, which is located in the left end of the instrument panel. The power distribution box is found in the engine compartment, mounted on a bracket attached to the left fender apron. To access the fuse panel, remove the fuse panel cover by inserting your finger in the divot and pulling on the cover. The underside of the cover contains four spare fuses. A fuse pulling tool is located in the lower right corner of the fuse panel in case you need to replace a blown fuse.
- On the fuse panel cover, find the number of the fuse you want to check. The diagram on the cover tells you where to locate the fuse on the panel.
- Check the fuse to see if it is blown. Look through the clear side of the fuse to see if the metal wire inside is separated. If it is, the fuse is blown and should be replaced.
- Replace the fuse with one that has the right amperage rating.
- Put the fuse panel cover back on.
Even after you replace a fuse, it will continue to blow if you do not find what caused the overload. If the fuse continues to blow, have your electrical system checked.
Location of Fuse Boxes
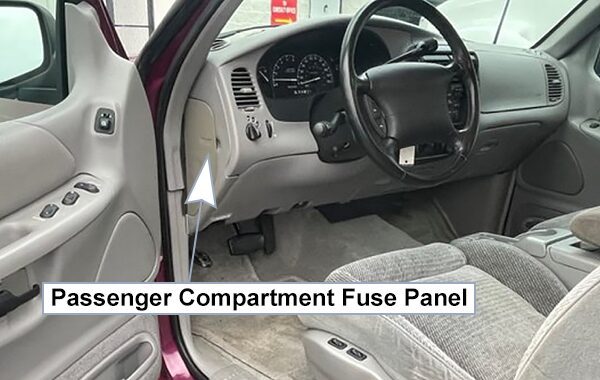
Passenger Compartment Fuse Panel:
Pull the panel out to access the passenger compartment fuse panel.
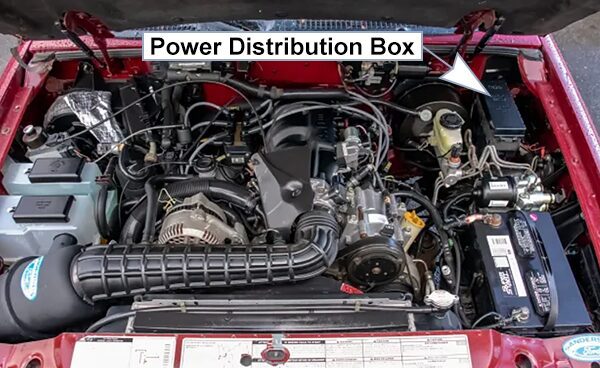
Power Distribution Box:
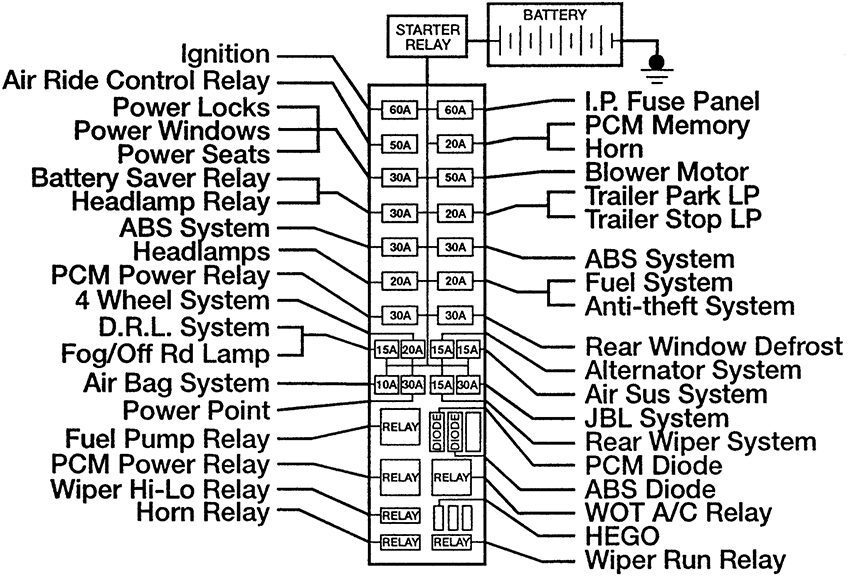
The high current fuses contained in the Power Distribution Box protect your vehicle’s main electrical systems from overloads; these fuses provide the connection between the battery and your vehicle’s electrical systems. A blown high current fuse may be replaced but will continue to blow until the cause of the overload condition is corrected. Ford recommends that high current fuses be replaced by a qualified technician.
Relays:
Relays are located in the power distribution box. Relays receive signals from components or systems and transfer these signals to activate or deactivate other components or systems. Ford recommends that relays be replaced by a qualified service technician.
Fuse Box Diagrams
1996
Passenger Compartment Fuse Panel
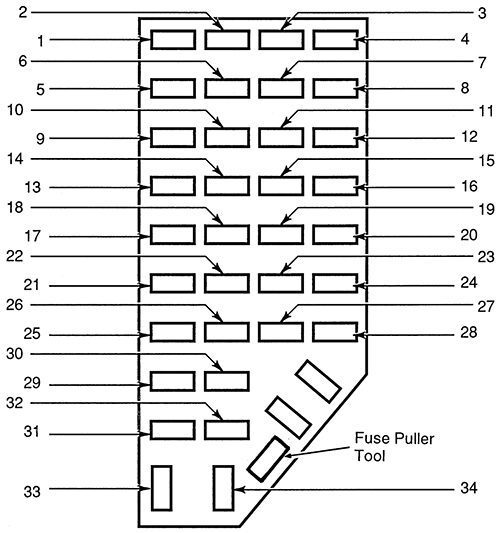
List of fuses in the passenger compartment fuse panel (1996)
| № | A | Description |
|---|---|---|
| 1 | 7.5A | Power mirror Power antenna |
| 2 | 7.5A | High-mount stoplamp |
| 3 | 15A | Parking lamps |
| 4 | 10A | Left headlamp |
| 5 | 10A | OBD system |
| 6 | 7.5A | Airbag system Blower relay |
| 7 | 7.5A | Illum. switches |
| 8 | 10A | Right headlamp Fog lamp system |
| 9 | 10A | EATC memory Seat memory Message center Cellular phone |
| 10 | 7.5A | EATC system Rear blower Speed control CÍEM system Brake interlock Overhead console Automatic Ride Control |
| 11 | 7.5A | Warning lamps |
| 12 | 10A | Front/rear wash |
| 13 | 15A | PCM system Stoplamps 4 wneel drive Anti-lock brake Speed control Trailer tow |
| 14 | 10A | Anti-lock system |
| 15 | 7.5A | Air bag system Alternator |
| 16 | 30A | Frontwiper |
| 17 | 15A | Cigar lighter |
| 18 | 15A | A/C system |
| 19 | 25A | Ignition coil PCM system |
| 20 | 7.5A | Radio Power Antenna GEM system Anti-theft Cellular phone |
| 21 | 15A | Hazard lamps |
| 22 | 10A | Turnsignals |
| 23 | 10A | Rear wiper system |
| 24 | 10A | Starter relay |
| 25 | 7.5A | Speedometer GEM system |
| 26 | 10A | 4R44E/4R55E overdrive DRL system Backup lamps 4 wheel drive Rear defroster |
| 27 | 15A | Under hood lamp Map lights Glove dox lamp Dome lamp Visor lamps Accessory delay Dimmer switch illum. 4×4 system |
| 28 | 7.5A | Memory seat GEM system |
| 29 | 10A | Audio system |
| 30 | – | Not Used |
| 31 | 7.5A | Aux. blower system |
| 32 | 7.5A | Heated mirror Heated backlite |
| 33 | 15A | High beam lamps |
| 34 | 7.5A | Lux audio system |
Power Distribution Box
1997
Passenger Compartment Fuse Panel
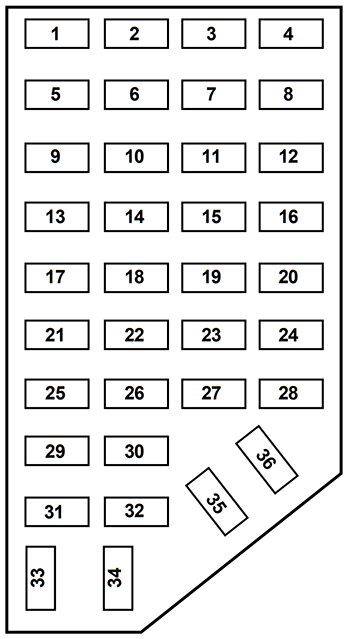
List of fuses in the passenger compartment fuse panel (1997)
| № | A | Circuits Protected |
|---|---|---|
| 1 | 7.5A | Power mirror, power antenna |
| 2 | 7.5A | High-mount brakelamp |
| 3 | 15A | Parking lamp, instrument cluster gauges |
| 4 | 10A | Left headlamp, lamp out warning |
| 5 | 10A | OBD system |
| 6 | 7.5A | Air bag system, blower relay, EATC |
| 7 | 7.5A | Illumination switches |
| 8 | 10A | Right headlamp, fog lamp system, DRL, lamp out warning |
| 9 | 10A | EATC system, seat memory, message center, cellular phone, autolamps |
| 10 | 7.5A | EATC system, rear blower, speed control, GEM system, brake interlock, overhead console, automatic ride control, lamp out warning |
| 11 | 7.5A | Warning lamps, autolamp |
| 12 | 10A | Front washer, rear washer & wiper |
| 13 | 15A | PCM system, stoplamps, AWD, anti-lock brake, speed control, trailer tow |
| 14 | 10A | Anti-lock system |
| 15 | 7.5A | Air bag system, instrument cluster |
| 16 | 30A | Wiper run relay |
| 17 | 25A | Cigar lighter |
| 18 | 15A | A/C system |
| 19 | 25A | Ignition coil, PCM system |
| 20 | 7.5A | Radio, power antenna, GEM system, anti-theft, cellular phone |
| 21 | 15A | Turn/hazard flasher |
| 22 | 10A | Turn signals |
| 23 | 10A | Rear wiper system |
| 24 | 10A | Starter relay |
| 25 | 7.5A | Speedometer, GEM system |
| 26 | 10A | 5R55E/4R70W overdrive, DRL system, backup lamps, AWD, rear defroster |
| 27 | 10A | Under hood lamp, map lamps, glove box lamp, dome lamp, visor lamps, accessory delay, dimmer switch illumination, 4×4 system |
| 28 | 7.5A | Memory seat, GEM system |
| 29 | 10A | Audio system |
| 30 | – | Not used |
| 31 | 7.5A | Rear blower system |
| 32 | 7.5A | Heated mirror, rear defroster |
| 33 | 15A | High beam lamps |
| 34 | 7.5A | Lux audio system |
Power Distribution Box
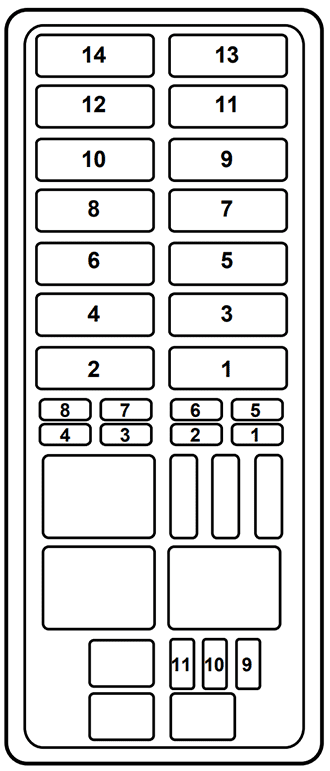
List of fuses in the power distribution box (1997)
| № | A | Circuits protected |
|---|---|---|
| Maxi fuses | ||
| 1 | 30A | Rear window defrost |
| 2 | 30A | PCM power relay |
| 3 | 20A | Fuel system, anti-theft system |
| 4 | 20A | Headlamps |
| 5 | 30A | ABS system |
| 6 | 30A | ABS system |
| 7 | 20A | Trailer park LP and trailer stop LP |
| 8 | 30A | Battery saver relay and headlamp relay |
| 9 | 50A | Blower motor |
| 10 | 30A | Power locks, power Windows and power seats |
| 11 | 20A | PCM memory and horn |
| 12 | 50A | Air ride control relay |
| 13 | 60A | Instrument panel fuse panel |
| 14 | 60A | Ignition |
| Mini fuses | ||
| 1 | 30A | JBL system |
| 2 | 15A | Rear wiper system |
| 3 | 30A | Power point |
| 4 | 20A | 4WD system |
| 5 | 15A | Air suspension system |
| 6 | 15A | Alternator system |
| 7 | 10A | Air bag system |
| 8 | 15A | DRL/Fog lamps/Off-road lamps |
| 9 | – | Not used |
| Maxi fuses | ||
| 10 | – | Not used |
| 11 | 20A | HEGO system |
Relays
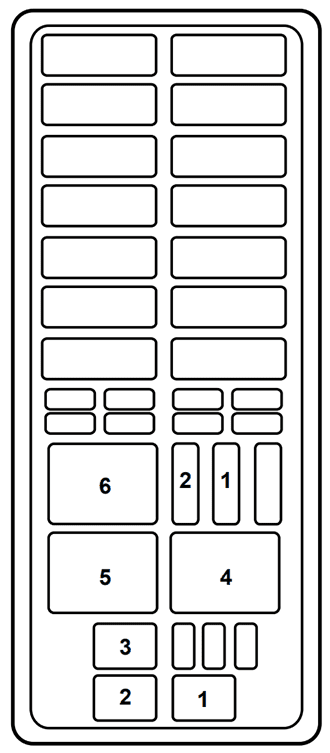
| № | Circuits protected |
|---|---|
| Relay | |
| 1 | Wiper run relay |
| 2 | Horn relay |
| 3 | Wiper HI/LO relay |
| 4 | WOT A/C relay |
| 5 | PCM power relay |
| 6 | Fuel pump relay |
| Diode | |
| 1 | ABS diode |
| 2 | PCM diode |
Conclusion
Understanding the fuse box and relay locations in your 1995-1997 Ford Explorer gives you the confidence to troubleshoot common electrical issues without unnecessary trips to the mechanic. From the engine bay’s Power Distribution Box to the interior fuse panel near the driver’s kick panel, knowing these locations makes diagnosing problems faster and more straightforward.
That said, given the age of these vehicles, if you’ve checked the relevant fuses and relays and the issue persists, it may be worth consulting a mechanic experienced with older Ford vehicles. Aging wiring harnesses and connectors can sometimes cause intermittent electrical problems that go beyond a simple fuse replacement, and a professional diagnosis can help you avoid guesswork.