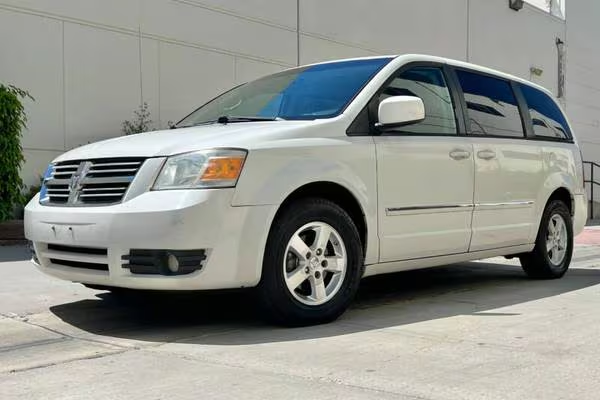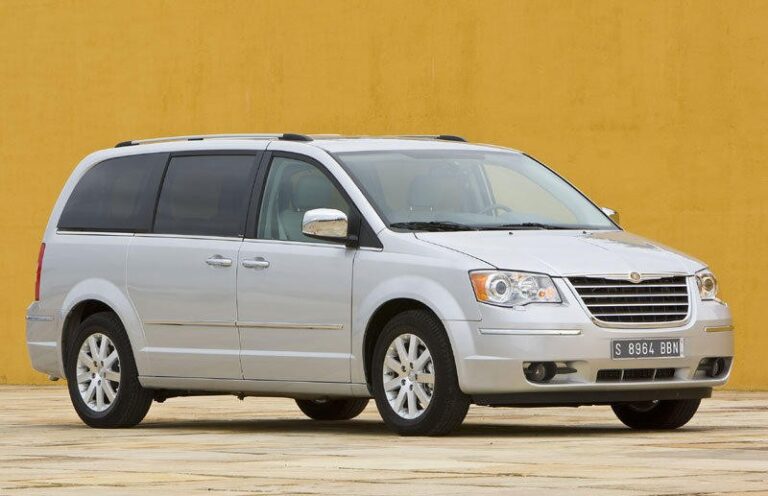
If you are looking for the Toyota Tarago / Previa (2013-2015) fuse box, this guide will help you find the main fuse and relay locations quickly. Fuses protect the vehicle’s electrical circuits from overloads, while relays help control higher-power systems such as lights, fans, and other accessories.
Knowing the fuse box location matters when you are troubleshooting simple electrical problems. If a light stops working, a power outlet fails, or a system suddenly cuts out, the cause may be a blown fuse or a faulty relay. Finding the correct box first saves time and makes basic repairs much easier.
MUST READ: DYI – How to Check Car Fuses?
(2013-2015) Toyota Tarago / Previa fuse box and relay with Diagram
WARNING
- Never replace a fuse with one that has a higher amperage rating.
- A fuse with a too-high amperage could damage the electrical part and cause a fire.
- On no account should fuses be repaired (e.g. patched up with tin foil or wire) as this may cause serious damage elsewhere in the electrical circuit or cause a fire.
- If a fuse blows repeatedly, do not keep replacing it. Instead, have the cause for the repeated short circuit or overload tracked and fixed.
- Terminal and harness assignments for individual connectors will vary depending on vehicle equipment level, model, and market.
Toyota Tarago / Previa (2013-2015) fuse assignment
Toyota Tarago / Previa Year of production: 2013, 2014, 2015
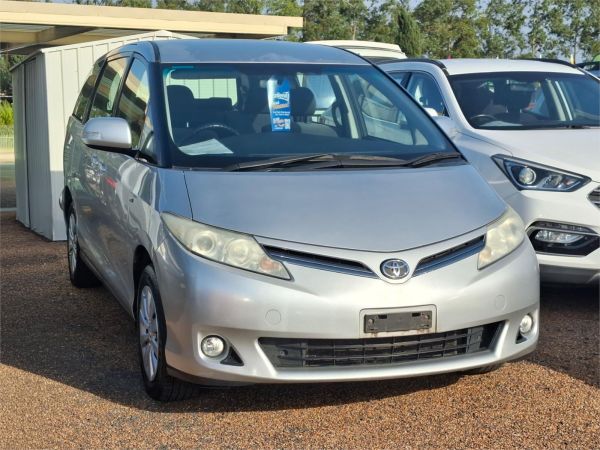
Engine Bay Fuse Box
The main fuse and relay box is located in the engine compartment. On the Toyota Tarago / Previa (2013-2015), it is usually found near the battery and inner fender area, inside a black plastic cover.
To access it, open the hood and look for the rectangular fuse box cover. Release the clips or tabs and lift the cover off carefully. Under the lid, you will usually find the main fuses, fusible links, and several relays. This box often contains circuits for major systems, so it is one of the first places to check when there is an electrical fault.
Before opening this fuse box, make sure the ignition is off and the key is removed. If you plan to inspect or replace larger fuses or relays, disconnecting the negative battery terminal is a safer option.
Interior Fuse Box
The second main fuse box is inside the cabin. On most Toyota Tarago / Previa (2013-2015) models, it is located on the driver’s side under the dashboard, close to the steering wheel area. In some versions, you may need to open the driver’s door and remove a small side panel or lower trim cover to reach it.
To access the interior fuse box, look underneath the dash and find the plastic cover. Pull the cover gently or release the retaining clips, depending on the trim design. Once the panel is removed, you will see the smaller cabin fuses that protect interior electrical systems such as the radio, instrument cluster, power windows, and other convenience features.
If the fuse box is hard to reach, use a flashlight and move the steering wheel if needed to create more space. Always switch off the ignition before checking any fuse inside the cabin.
Relay Locations
Most relays on this vehicle are grouped with the fuse boxes rather than placed in a separate large relay panel. The main relay locations are usually inside the engine bay fuse box and the interior fuse box.
The engine bay box typically holds relays for higher-load systems, while the interior box may handle smaller body and comfort circuits. If you are using a relay diagram, compare the relay positions carefully with the label on the fuse box cover or the owner’s manual. The diagram will show which slot belongs to each relay, so you can identify the correct part without guessing.
If a system is not working and the fuse looks fine, the relay may be the next item to check. Some relays can be swapped with another identical relay for testing, but only if the diagram shows they are the same type and rating.
How to Identify the Correct Fuse or Relay
Use the diagram on the fuse box cover or the separate relay diagram provided for your vehicle. Each fuse position should match a circuit name and amperage rating. This is important because replacing a fuse with the wrong rating can cause more damage or create a safety risk.
If a fuse looks blown, replace it with one of the same amperage only. Never use a higher-rated fuse just to get the system working again. If the new fuse blows quickly, there is likely a deeper electrical problem that needs attention.
A fuse puller is usually included in one of the fuse boxes. If not, use a proper plastic fuse puller or needle-nose pliers carefully. Avoid metal tools if possible, since they can short the circuit.
Safety Tips Before Checking Fuses
Always turn the ignition off before handling any fuse or relay. If you are working in the engine bay or on high-current circuits, disconnect the negative battery terminal first. This helps reduce the risk of short circuits.
Also, make sure your hands are dry and avoid forcing covers or clips. Toyota fuse box covers are usually designed to come off easily, and forcing them can break the tabs.
Passenger compartment
Fuse box location (box no. 1 – left side)
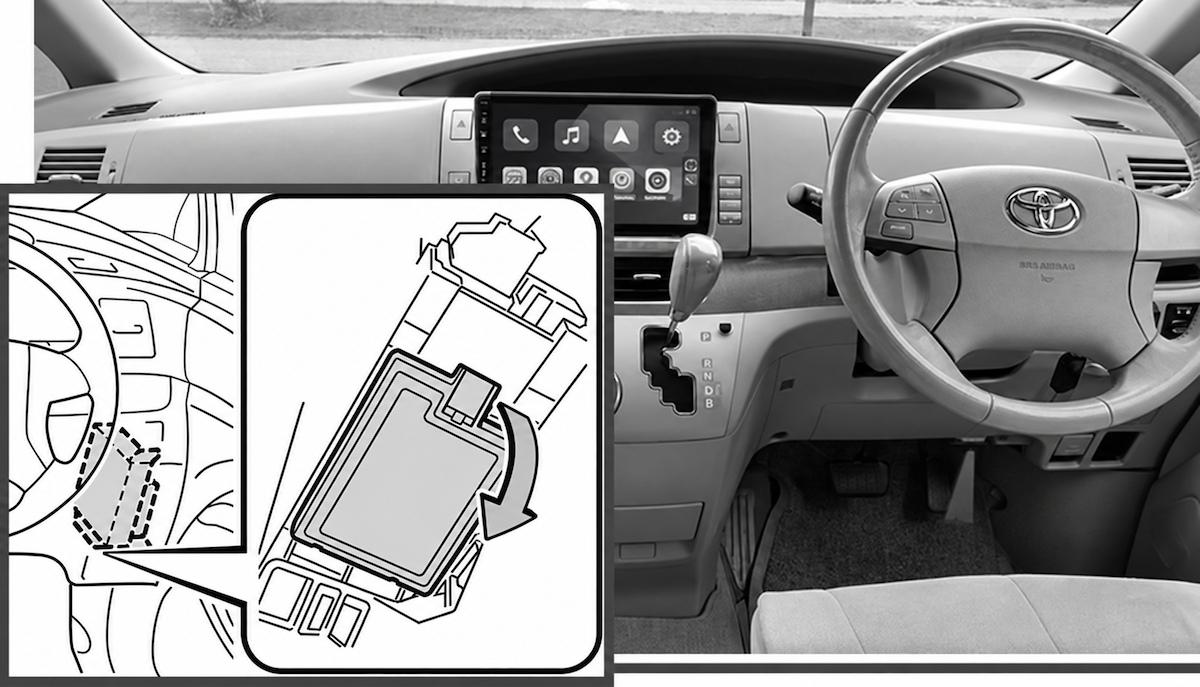
Passenger compartment
Fuse box diagram (box no. 1 – left side)
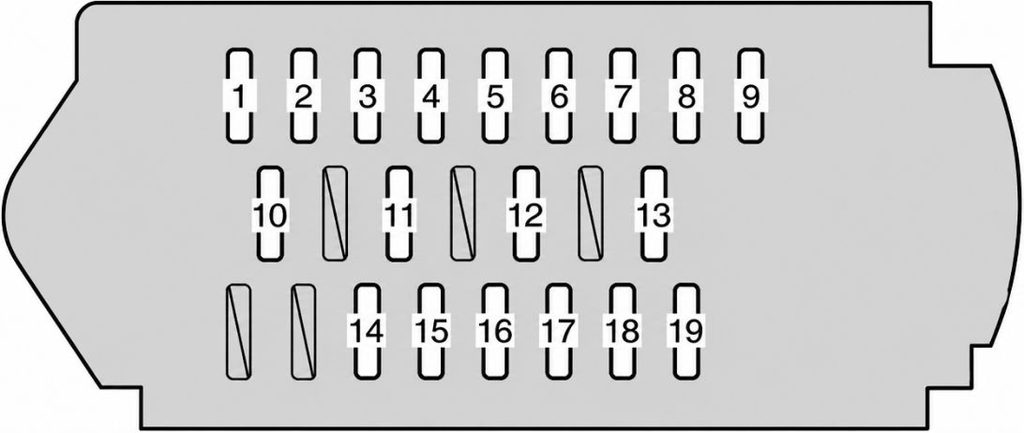
Assignment of the fuses in the passenger compartment (box no. 1 – left side)
| No | Name | Amp | Description |
|---|---|---|---|
| 1 | WELCAB | 30A | No circuit |
| 2 | 4WD | 7.5A | No circuit |
| 3 | AC INV | 15A | No circuit |
| 4 | DR LOCK | 30A | Smart entry & start system, pushbutton start system, multiplex communication system |
| 5 | P/W FL | 20A | Power windows |
| 6 | S/R | 20A | Rear sunshade |
| 7 | PSD LH | 30A | Power sliding doors |
| 8 | P/W RL | 20A | Power windows |
| 9 | PBD | 30A | No circuit |
| 10 | RR WIP | 15A | Windshield wipers and washer, rear window wiper and washer, headlight cleaners |
| 11 | GAUGE №1 | 10A | Anti-lock brake system, vehicle stability control, adaptive frontlighting system, electric cooling fans, Toyota parking assist-sensor, headlight cleaners |
| 12 | PANEL | 10A | Instrument panel lights, Toyota parking assist-sensor |
| 13 | TAIL | 10A | Front fog lights, tail lights, front position lights, license plate lights |
| 14 | LH ECU-IG | 10A | Adaptive front-lighting system, multiplex communication system, smart entry & start system, pushbutton start system, power sliding doors, power seat (third seats) |
| 15 | SEAT HTR LH | 10A | Seat heater LH |
| 16 | GAUGE №2 | 10A | Charging system, automatic transmission system / continuously variable transmission system, back-up lights, Toyota parking assist-sensor, power seat (third seats) |
| 17 | STP RR | 7.5A | No circuit |
| 18 | STP HI MT | 7.5A | No circuit |
| 19 | STP RL | 7.5A | No circuit |
Passenger compartment
Fuse box location (box no. 2 – right side)
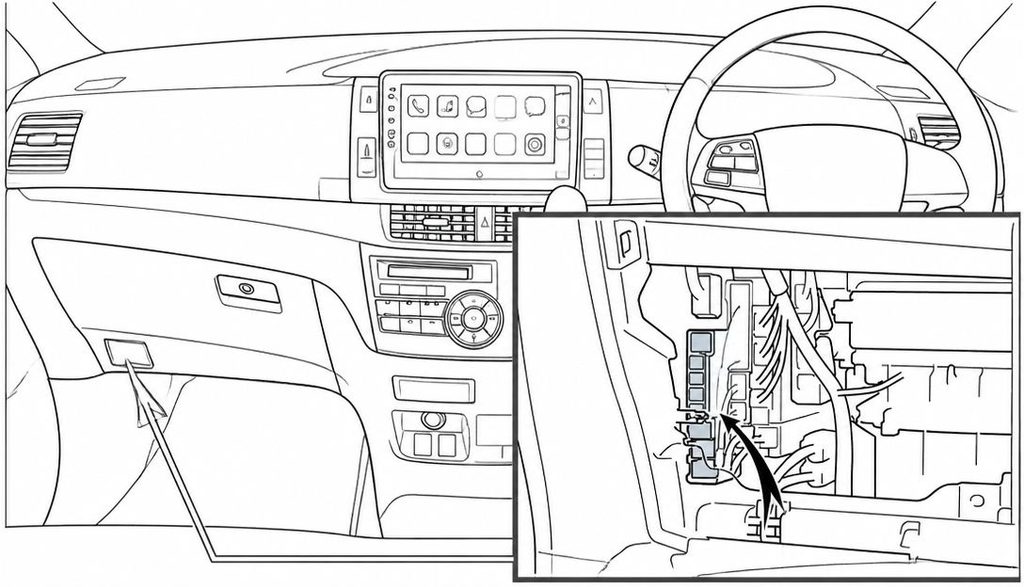
Passenger compartment
Fuse box diagram (box no. 2 – right side)
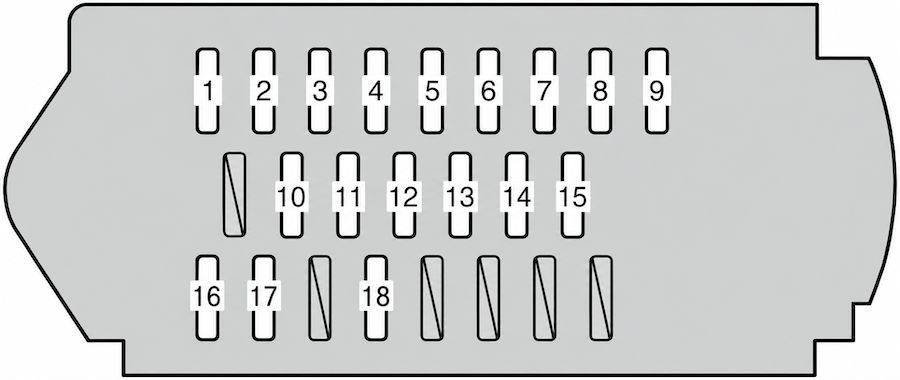
Assignment of the fuses in the passenger compartment (box no. 2 – right side)
| No | Name | Amp | Description |
|---|---|---|---|
| 1 | PSB | 30A | No circuit |
| 2 | RR FOG | 7.5A | No circuit |
| 3 | P/W FR | 20A | Power windows |
| 4 | P/SEAT RH | 30A | Power seat (Front seat) |
| 5 | AM1 | 7.5A | No circuit |
| 6 | STOP | 15A | Stop lights, high mounted stoplight, automatic transmission system / continuously variable transmission system, shift lock system, multiport fuel injection system / sequential multiport fuel injection system, anti-lock brake system, vehicle stability control |
| 7 | OBD | 7.5A | On-board diagnosis system |
| 8 | PSD RH | 30A | Power sliding doors |
| 9 | P/W RR | 20A | Power windows |
| 10 | P/POINT | 15A | Power outlet |
| 11 | P/POINT №2 | 15A | Power outlet |
| 12 | RAD №2 | 7.5A | Audio system, rear seat entertainment system |
| 13 | ECU-ACC | 7.5A | Smart entry & start system, pushbutton start system, outside rear view mirrors, shift lock system |
| 14 | IGN | 10A | Multiport fuel injection system / sequential multiport fuel injection system, SRS airbag system, multiplex communication system |
| 15 | MET | 7.5A | Gauges and meters |
| 16 | FR WIP | 30A | Windshield wipers and washer |
| 17 | SEAT HTR RH | 10A | Seat heater RH |
| 18 | RH ECU-IG | 10A | Vehicle stability control, air conditioning system, Toyota parking assist sensor, automatic transmission system / continuously variable transmission system, electric power steering, smart entry & start system, push-button start system, power sliding doors, rear sunshade, shift lock system, turn signal lights, emergency flashers, vanity lights, multiplex communication system |
Passenger compartment
Fuse box location (box no. 3)
To access:
- Open the glove box. Slide off the damper.
- Pull both side of the glove box from the inside to disconnect the upper claws.
- Pull out the glove box and disconnect the lower claws.
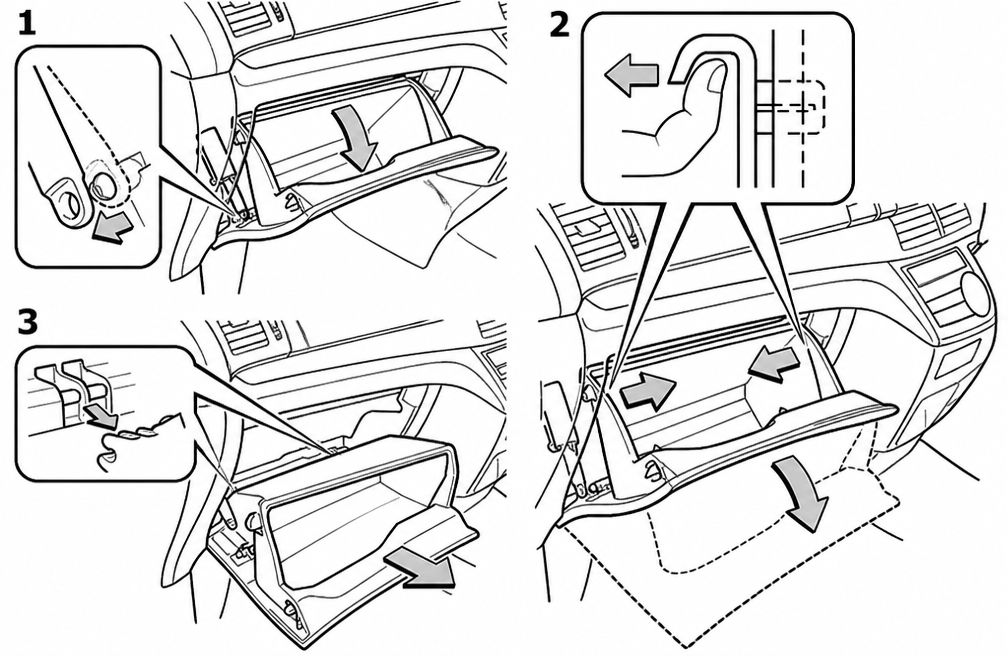
Passenger compartment
Fuse box diagram (box no. 3)
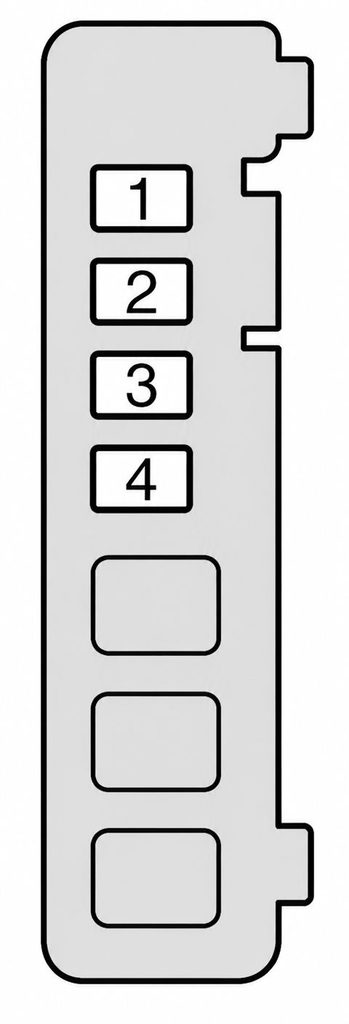
Assignment of the fuses in the passenger compartment (box no. 3)
| No | Name | Amp | Description |
|---|---|---|---|
| 1 | HTR | 50A | Air conditioning system |
| 2 | 3RD SEAT RH | 30A | Power seat (Third seats) |
| 3 | 3RD SEAT LH | 30A | Power seat (Third seats) |
| 4 | RR A/C | 30A | Air conditioning system |
Engine compartment
Fuse box location
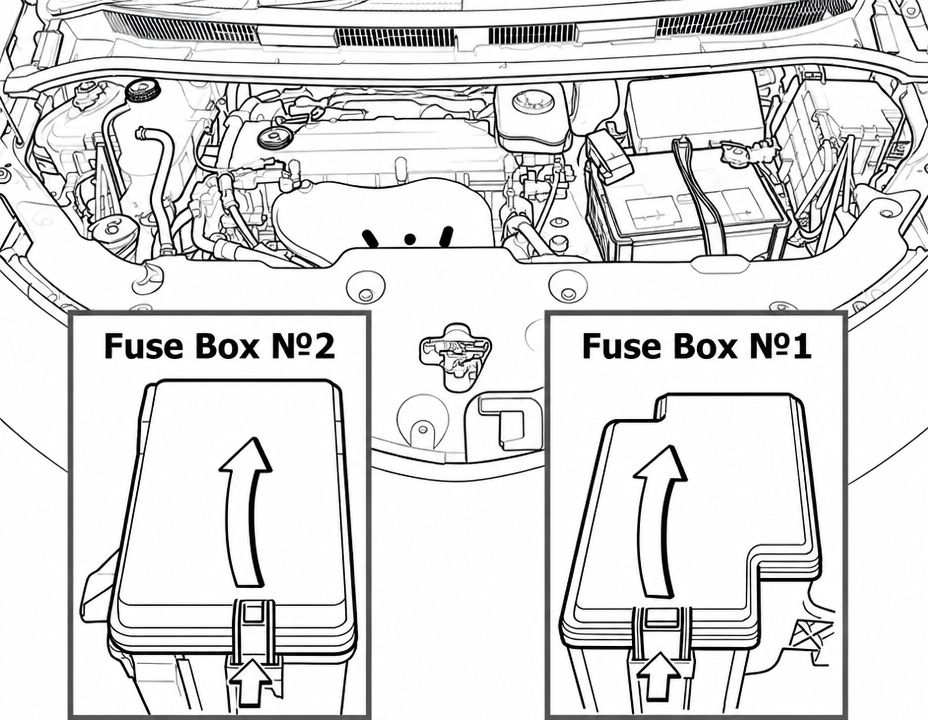
Engine compartment
Fuse box diagram (box no. 1)
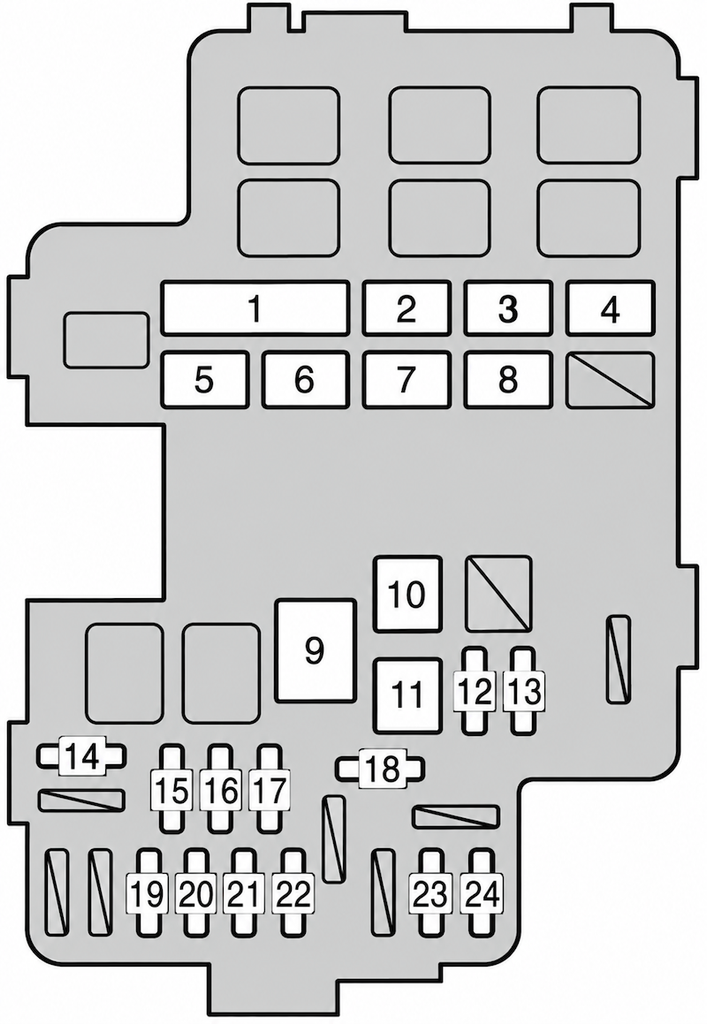
Assignment of the fuses in the engine compartment (box no. 1)
| No | Name | Amp | Description |
|---|---|---|---|
| 1 | RH R/B ALT | 100A | CDS FAN, RDI FAN, PTC №1, PTC №2, PTC №3, H-LP CLAN, FOG fuse |
| 2 | RH-MAIN-JB | 60A | STOP, AM1, STP HI MT, STP RR, STP RL, OBD, P/W RR, PSB, P/ W FR, RR FOG, P/SEAT RH, PSD RH, CIG ECU-ACC, RAD №2, P/POINT, FR WIP, SEAT HTR RH, RH ECU-IG fuse |
| 3 | LH-MAIN-JB | 80A | TAIL, PANEL, P/W RL, PSD LH, S/R, 4WD, PBD, P/W FL, DR LOCK, GAUGE №1, RR WIP, SEAT HTR LH, GAUGE №2, LH ECU-IG, WASH fuse |
| 4 | SUB R/B | 80A | HTR. RR A/C, 3RD SEAT RH, 3RD SEAT LH fuse |
| 5 | F/B ALT | 100A | ABS №1, ABS №2, DEF fuse |
| 6 | ALT | 140A | Gauges and meters, charging system, F/B ALT, SUB R/B, RH-MAIN-JB, LH-MAIN-JB, RH R/B ALT fuse |
| 7 | F/B BATT | 120A | EPS, ST, A/F, EFI, TRN HAZ, IG2, FR DOOR, ETC-S, AM2 №2, AM2 N0.1, DOME, ECU-B, RAD №1 fuse |
| 8 | RH R/B BATT | 60A | Headlight cleaners, H-LP RL, H-LP LL, S/HORN, ECU-B3, ECU-B2, AMP, STRG LCK, HORN, H-LP RH, H-LP LH fuse |
| 9 | EPS | 80A | Electric power steering |
| 10 | ST | 30A | Multiport fuel injection system / sequential multiport fuel injection system, smart entry & start system, push-button start system |
| 11 | ABS №1 | 50A | Anti-lock brake system, vehicle stability control |
| 12 | ABS №2 | 30A | Anti-lock brake system, vehicle stability control |
| 13 | DEF | 25A | Rear window defogger, MIR HTR |
| 14 | EFI | 20A | Multiport fuel injection system / sequential multiport fuel injection system |
| 15 | ECU-B | 10A | Gauges and meters, air conditioning system, smart entry & start system, push-button start system, power sliding doors, multiplex communication system, wireless remote control system |
| 16 | DOME | 7.5A | Interior lights, luggage compartment light, door courtesy lights, front personal lights, rear personal lights, multiplex communication system |
| 17 | RAD №1 | 15A | Audio system, rear seat entertainment system |
| 18 | MIR HTR | 10A | No circuit |
| 19 | ETC-S | 10A | Multiport fuel injection system / sequential multiport fuel injection system |
| 20 | AM2 №2 | 7.5A | Multiport fuel injection system / sequential multiport fuel injection system, smart entry & start system, push-button start system |
| 21 | TRN HAZ | 15A | Turn signal lights, emergency flashers |
| 22 | IG2 | 15A | Multiport fuel injection system / sequential multiport fuel injection system, smart entry & start system, push-button start system, starting system, MET, IGN fuse |
| 23 | FR DOOR | 30A | Smart entry & start system, pushbutton start system, multiplex communication system |
| 24 | A/F | 30A | Multiport fuel injection system / sequential multiport fuel injection system |
Engine compartment
Fuse box diagram (box no. 2)
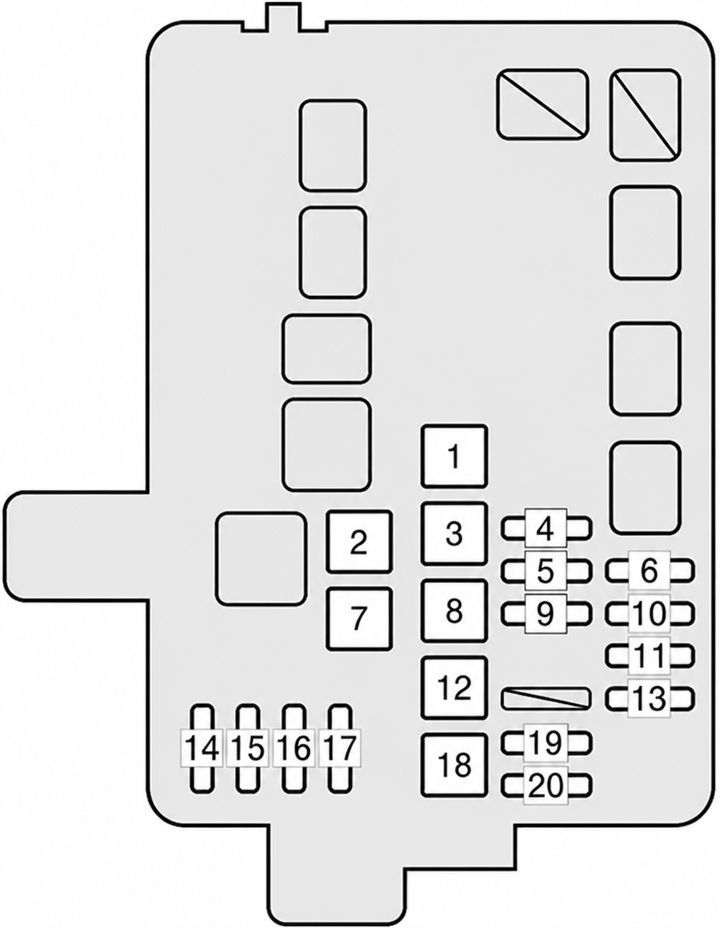
Assignment of the fuses in the engine compartment (box no. 2)
| No | Name | Amp | Description |
|---|---|---|---|
| 1 | WEL CAB | 30A | No circuit |
| 2 | CDS FAN | 50A | 2AZ-FE engine: Electric cooling fans |
| RDI FAN №2 | 50A | 2GR-FE engine: Electric cooling fans | |
| 3 | H-LP CLN | 30A | Headlight cleaners |
| 4 | ECU-B3 | 7.5A | Smart entry & start system, pushbutton start system |
| 5 | ECU-B2 | 7.5A | Power windows |
| 6 | HORN | 10A | Horns |
| 7 | RDI FAN | 50A | 2AZ-FE engine: Electric cooling fans |
| RDI FAN №1 | 50A | 2GR-FE engine: Electric cooling fans | |
| 8 | PTC №3 | 50A | Air conditioning system |
| 9 | S/HORN | 10A | Smart entry & start system |
| 10 | STRG LCK | 20A | Smart entry & start system, pushbutton start system, steering lock system |
| 11 | AMP2 | 30A | No circuit |
| 12 | PTC №2 | 50A | Air conditioning system |
| 13 | AMP1 | 30A | No circuit |
| 14 | H-LP LH | 15A | Left-hand headlight (high beam) |
| 15 | H-LP RH | 15A | Right-hand headlight (high beam) |
| 16 | H-LP LL | 15A | Left-hand headlight (low beam) |
| 17 | H-LP RL | 15A | Headlight leveling system, right-hand headlight (low beam) |
| 18 | PTC №1 | 50A | Air conditioning system |
| 19 | DEICER | 20A | No circuit |
| 20 | FOG | 15A | Front fog lights |
Conclusion
Understanding the Toyota Tarago / Previa (2013-2015) fuse box and relay locations makes routine troubleshooting much simpler. Whether you are dealing with a non-working light, a dead power socket, or another electrical issue, knowing where to look can save time and effort.
Handle fuses carefully, replace them with the correct rating, and use the relay diagram to match each position properly. If a fuse keeps blowing or you are unsure which relay controls the circuit, it is a good idea to consult a qualified auto electrician or Toyota technician.