Chevrolet Volt (2011-2015) fuse box and relay Diagrams

The Chevrolet Volt (2011-2015) was a pioneering plug-in hybrid vehicle, blending electric power with a gasoline engine to deliver impressive efficiency and range. This innovative vehicle relies heavily on its electrical system, where the fuse box and relay components play essential roles in maintaining the car’s functionality and safety.
In the Chevrolet Volt, the fuse box is responsible for protecting various electrical circuits throughout the vehicle. These circuits control key systems such as the battery management system, electric motor, infotainment, lighting, and climate control. The Volt typically has multiple fuse boxes: one located inside the cabin, usually under the dashboard or in the glove compartment, and another in the engine compartment. Each fuse is designed to interrupt the circuit in the event of an electrical overload or short circuit, thereby preventing damage to critical components and ensuring the vehicle’s electrical system remains safe.
Relays in the Chevrolet Volt are critical for managing high-current circuits that are necessary for the operation of components such as the electric motor, cooling fans, fuel pump, and power windows. These relays act as switches that allow a small electrical signal to control a larger flow of current, thereby enabling the vehicle’s various systems to operate efficiently and reliably. Without properly functioning relays, the Volt’s complex electrical systems, including the hybrid powertrain, would be unable to perform optimally.
Maintenance of the fuse box and relays in the Chevrolet Volt is crucial for avoiding electrical issues that could compromise the vehicle’s performance. Regularly checking the fuses and relays can help identify potential problems before they lead to more serious failures, such as a malfunctioning electric motor, non-operational climate control, or lighting issues. If a fuse blows or a relay fails, it’s important to replace it with a component of the correct specification to ensure the continued safe and efficient operation of the vehicle.
Given the Chevrolet Volt’s reliance on its electrical systems, understanding the roles of the fuse box and relays is key to maintaining the car’s hybrid functionality. Proper upkeep of these components ensures the Volt’s advanced systems work seamlessly, allowing for a smooth and reliable driving experience.
MUST READ: DYI – How to Check Car Fuses?
(2011-2015) Chevrolet Volt fuse box and relay with Diagram
WARNING
- Never replace a fuse with one that has a higher amperage rating.
- A fuse with a too-high amperage could damage the electrical part and cause a fire.
- On no account should fuses be repaired (e.g. patched up with tin foil or wire) as this may cause serious damage elsewhere in the electrical circuit or cause a fire.
- If a fuse blows repeatedly, do not keep replacing it. Instead, have the cause for the repeated short circuit or overload tracked and fixed.
- Terminal and harness assignments for individual connectors will vary depending on vehicle equipment level, model, and market.
Chevrolet Volt 2011-2015 fuse assignment
- Cigar lighter (power outlet) fuses in the Chevrolet Volt are the fuses F1 (Power Outlet – Top of IP Storage Bin) and F15 (Power Outlet Inside Floor Console/Rear of Floor Console) in the Driver’s Side Instrument panel fuse box.
Year of production: from 2011, 2012, 2013, 2014, 2015
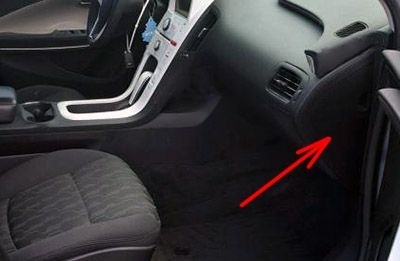
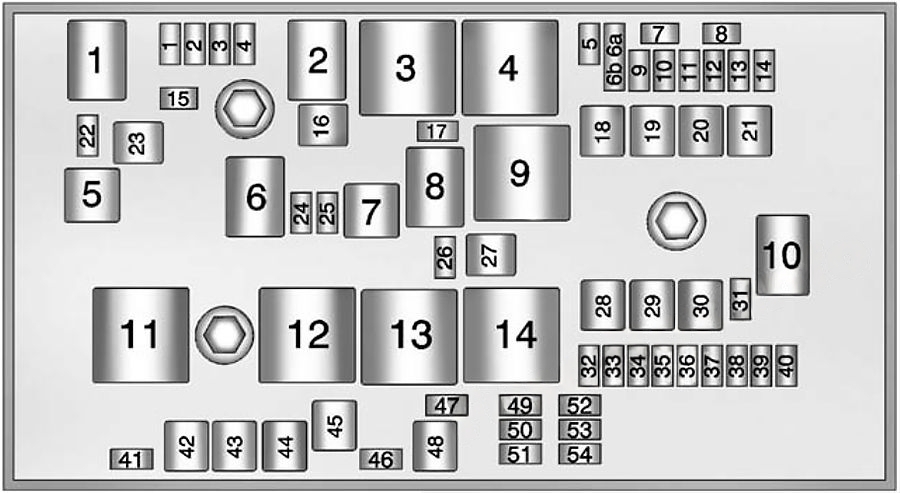
Instrument Panel Fuse Box №. 1 (Driver’s Side)
Fuse box location
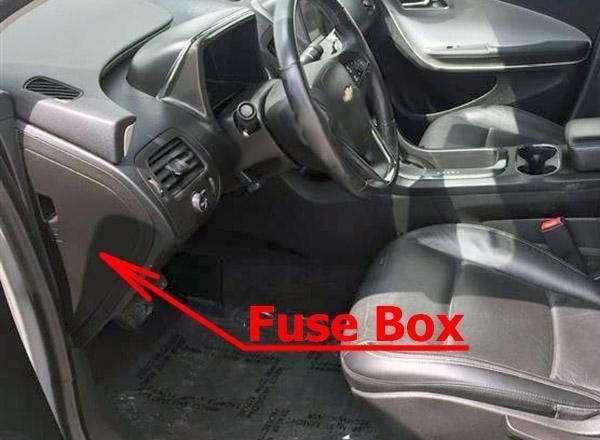
It is located on the driver’s side of the instrument panel, behind the cover.
Fuse box diagram
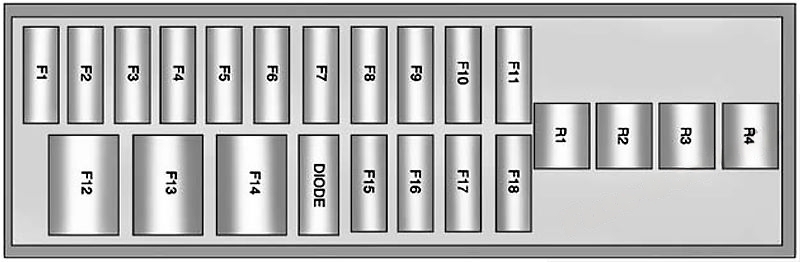
Assignment of the fuses in the Instrument Panel Fuse Box №. 1
| № | Usage |
|---|---|
| F1 | Power Outlet – Top of IP Storage Bin |
| F2 | Radio |
| F3 | Instrument Cluster |
| F4 | Infotainment Display |
| F5 | Heating, Ventilation & Air Conditioning/ Integrated Center Stack Switches |
| F6 | Airbag (Sensing Diagnostic Module/ Passenger Sensing Module) |
| F7 | 2011: Data LinkConnector 1/DataLink Connector 2 2012-2015: Data Link Connector, Left (Primary) |
| F8 | Empty |
| F9 | 2011: Empty 2012-2015: OnStar |
| F10 | Body Control Module 1/Body Control Module Electronics/Keyless Entry/Power Moding/ Center High Mounted Stoplamp/ License Plate Lamps/Left Daytime Running Lamp/Left Parking Lamps/ Hatch Release Relay Control/ Washer Pump Relay Control/Switch Indicator Lights |
| F11 | Body Control Module 4/Left Headlamp |
| F12 | Empty |
| F13 | Empty |
| F14 | Empty |
| F15 | Power Outlet (Inside Floor Console/Rear of Floor Console) |
| F16 | Empty |
| F17 | Empty |
| F18 | Empty |
| Relays | |
| R1 | Retained Accessory Power Relay for Power Outlets |
| R2 | Empty |
| R3 | Empty |
| R4 | Empty |
| Diodes | |
| DIODE | Empty |
Instrument Panel Fuse Box №. 2 (Passenger’s Side)
Fuse box location
It is located on the on the passenger side of the instrument panel, behind the cover.
Fuse box diagram
Assignment of the fuses in the Instrument Panel Fuse Box №. 2
| № | Usage |
|---|---|
| F1 | Steering Wheel Switch Backlighting |
| F2 | Empty |
| F3 | Empty |
| F4 | Body Control Module 3/Right Fleadlamp |
| F5 | Body Control Module 2/Body Control Module Electronics/Hatch Lamp/Right Daytime Running Lamp/ Shifter Lock/Switch Backlighting |
| F6 | 2011-2013: Body ControlModule 5/RetainedAccessory PowerRelay Control/RightFront Turn SignalLamp/Left Rear Stopand Turn SignalLamp/Right ParkingLamps/RemotePRNDL
2014-2015: Empty |
| F7 | Body Control Module 6/Map Lights/Courtesy Lights/Back-up Lamp |
| F8 | Body Control Module 7/Left Front Turn Signal/Right Rear Stop and Turn Signal Lamp/Child Security Lock Relay Control |
| F9 | Body Control Module 8/Locks |
| F10 | 2011: OnStar 2012-2015: Data Link Connector, Right (Secondary) |
| F11 | Universal Garage Door Opener (If Equipped) |
| F12 | Blower Motor |
| F13 | Empty |
| F14 | Empty |
| F15 | Empty |
| F16 | Empty |
| F17 | Empty |
| F18 | Empty |
| Relays | |
| R1 | Empty |
| R2 | Empty |
| R3 | Empty |
| R4 | 2011: Empty 2012-2015: Child Lockout Relay |
| Diodes | |
| DIODE | Empty |
Engine Compartment Fuse Box
Fuse box location
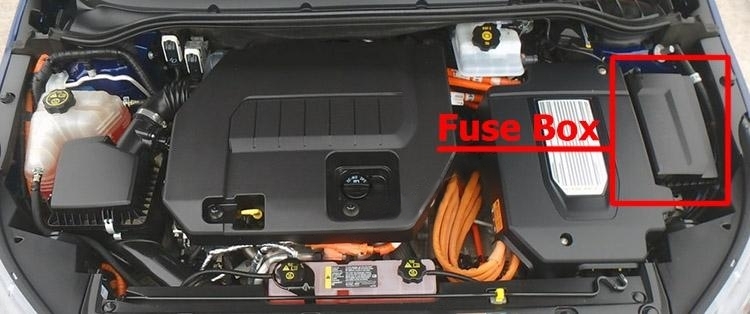
It is located in the engine compartment on the driver’s side.
Fuse box diagram
Assignment of the fuses and relays in the Engine Compartment
| Mini Fuses | Usage |
|---|---|
| 1 | Engine Control Module – Switched Power |
| 2 | Emissions |
| 3 | Not Used |
| 4 | Ignition Coils/ Injectors |
| 5 | Not Used |
| 6a | Empty |
| 6b | Empty |
| 7 | Empty |
| 8 | Empty |
| 9 | Heated Mirrors |
| 10 | Air Conditioning Control Module |
| 11 | Traction Power Inverter Module -Battery |
| 12 | 2011: Cabin Heater Pump and Valve 2012-2015: Not Used |
| 13 | 2011: Not used 2012-2015: Cabin Heater Pump and Valve |
| 14 | Not Used |
| 15 | Traction Power Inverter Module and Transmission Control Module -Battery |
| 17 | Engine Control Module – Battery |
| 22 | Left High -Beam Headlamp |
| 24 | Empty |
| 25 | Empty |
| 26 | Not Used |
| 31 | 2011: RechargeableE nergy Storage System (High Voltage Battery) Coolant Pump
2012-2015: Not Used |
| 32 | 2011: Sensing DiagnosticModule–Run/Crank
2012-2015: Run/Crank -Sensing Diagnostic Module (SDM), Instrument Cluster, Passenger Airbag Display, Automatic Dimming Inside Rearview Mirror (If Equipped) |
| 33 | 2011: Run/Crank for Fuel System Control Module/Vehicle Integration Control Module
2012-2015: Run/Crank for Vehicle Integration Control Module |
| 34 | Vehicle Integration Control Module -Battery |
| 35 | 2011: Power ElectronicsCoolant Pump 2012-2015: Not Used |
| 36 | 2011: Not used
2012-2015: Power Electronics Coolant Pump |
| 37 | Cabin Heater Control Module |
| 38 | 2011: Empty
2012-2015: Rechargeable Energy Storage System (High Voltage Battery) Coolant Pump |
| 39 | Rechargeable Energy Storage System (High Voltage Battery) Control Module |
| 40 | Front Windshield Washer |
| 41 | Right High-Beam Headlamp |
| 46 | Empty |
| 47 | Empty |
| 49 | Empty |
| 50 | 2011: Rear VisionCamera–Run/Crank (If Equipped)
2012-2015: Run/Crank – Rear Vision Camera, Accessory Power Module |
| 51 | 2011: Run/Crank for ABS/Rechargeable Energy Storage System (High Voltage Battery)/Charger
2012-2015: Run/Crank for ABS/ Rechargeable Energy Storage System (High Voltage Battery) |
| 52 | Engine Control Module/ Transmission Control Module -Run/Crank |
| 53 | Traction Power Inverter Module -Run/Crank |
| 54 | 2011: Run/Crank for Air Conditioning Control Module/Instrument Cluster/Passenger Airbag Display/Accessory Power Module
2012-2015: Run/Crank – Fuel System Control Module, Air Conditioning Control Module, On Board Charger |
| J-Case Fuses | |
| 16 | 2011: Empty 2012-2015: AIR Solenoid (PZEV Only) |
| 18 | Empty |
| 19 | Power Window -Front |
| 20 | Empty |
| 21 | Antilock Brake System Electronic Control Unit |
| 23 | 2011-2013: Charge Port Door 2014-2015: Empty |
| 27 | 2011: Empty 2012-2015: AIR Pump (PZEV Only) |
| 28 | Empty |
| 29 | Empty |
| 30 | Antilock Brake System Motor |
| 42 | Cooling Fan – Right |
| 43 | Front Wipers |
| 44 | Charger |
| 45 | Empty |
| 48 | Cooling Fan – Left |
| Mini Relays | |
| 3 | Powertrain |
| 4 | Heated Mirrors |
| 7 | Empty |
| 9 | 2011: Empty 2012-2015: AIR Pump (PZEV Only) |
| 11 | Empty |
| 12 | Empty |
| 13 | Empty |
| 14 | Run/Crank |
| Micro Relays | |
| 1 | Empty |
| 2 | 2011: Empty 2012-2015: AIR Solenoid (PZEV Only) |
| 6 | Empty |
| 8 | Empty |
| 10 | Empty |
| Ultra Micro Relays | |
| 5 | 2011-2013: Charge Port Door 2014-2015: Empty |
Rear Compartment Fuse Box
Fuse box location
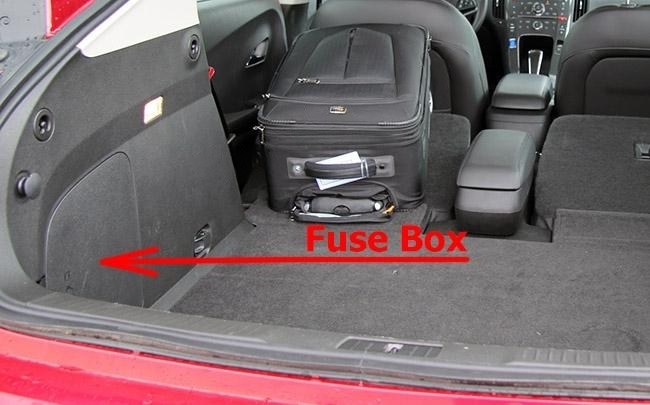
It is located behind a cover on the left side of the rear compartment.
Fuse box diagram
2011-2012
2013-2015
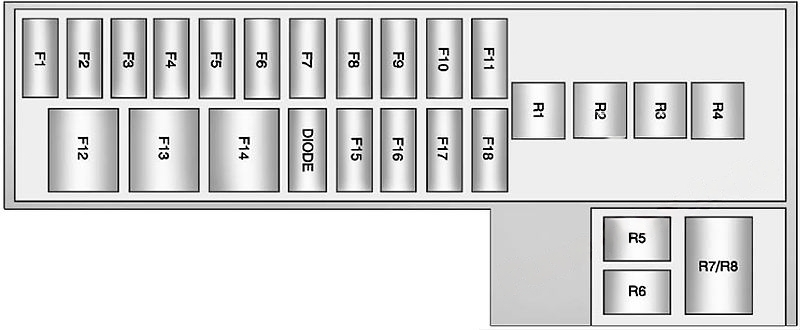
Assignment of the fuses and relays in the Luggage Compartment
| № | Usage |
|---|---|
| F1 | Empty |
| F2 | Fuel System Control Module |
| F3 | Passive Start/ Passive Entry Module |
| F4 | Heated Seats (If Equipped) |
| F5 | Driver Door Switches (Outside Rearview Mirror/ Charge Port Door Release/Refuel Request/Driver Window Switch) |
| F6 | Fuel (Diurnal Valve and Evap. Leak Check Module) |
| F7 | Accessory Power Module Cooling Fan |
| F8 | Amplifier (If Equipped) |
| F9 | Empty |
| F10 | Regulated Voltage Control/Front and Rear Parking Assist (If Equipped) |
| F11 | Horn |
| F12 | Rear Power Windows |
| F13 | Electric Parking Brake |
| F14 | Rear Defog |
| F15 | Empty |
| F16 | Hatch Release |
| F17 | Empty |
| F18 | Empty |
| Relays | |
| R1 | Rear Defog |
| R2 | Hatch Release |
| R3 | Empty |
| R4 | Empty |
| R5 | Empty |
| R6 | Empty |
| R7/R8 | 2013-2015: Horn |
| R7 | 2011-2012: Empty |
| R8 | 2011-2012: Horn |
| Diodes | |
| DIODE | Empty |
Conclusion
For owners and enthusiasts of classic Chevrolet Volt 2011-2015, understanding the fuse box and relay systems is essential for vehicle maintenance. Regular inspection and maintenance of these components helped ensure the vehicle’s longevity and reliability, preserving its status as a symbol of Chevrolet’s craftsmanship and innovation in the automotive industry during that era.