Chevrolet Cavalier 1990-1994 fuse box and relay Diagrams
The Chevrolet Cavalier (1990-1994) uses a basic but effective electrical system managed by fuses and relays. The fuse box, located under the dashboard on the driver’s side, protects circuits for essential components such as the headlights, turn signals, radio, and windshield wipers. Fuses prevent damage by cutting off the electrical current in case of an overload or short circuit, ensuring the vehicle’s electrical systems remain safe.
The relays in the Chevrolet Cavalier control key functions like the cooling fans, starter motor, and fuel pump. Relays act as switches, allowing a smaller electrical signal to control high-power systems. If a relay, like the starter relay, fails, it can prevent the engine from starting or cause issues with cooling.
Regular inspection of both the fuses and relays ensures that the Cavalier’s electrical systems work reliably. Replacing blown fuses and faulty relays prevents problems with critical systems, helping the vehicle maintain smooth functionality.
MUST READ: DYI – How to Check Car Fuses?
(1990-1994) Chevrolet Cavalier fuse box and relay with Diagram
WARNING
- Never replace a fuse with one that has a higher amperage rating.
- A fuse with a too-high amperage could damage the electrical part and cause a fire.
- On no account should fuses be repaired (e.g. patched up with tin foil or wire) as this may cause serious damage elsewhere in the electrical circuit or cause a fire.
- If a fuse blows repeatedly, do not keep replacing it. Instead, have the cause for the repeated short circuit or overload tracked and fixed.
- Terminal and harness assignments for individual connectors will vary depending on vehicle equipment level, model, and market.
Chevrolet Cavalier 1990-1994 fuse assignment
- Cigar lighter / power outlet fuses in the Chevrolet Cavalier are located in the Instrument panel fuse box (see fuses “CIG” (Cigarette Lighter) and “APO” (Accessory Power Outlet, if equipped)).
Year of production: from 1990, 1991, 1992, 1993, 1994
Fuse box diagram
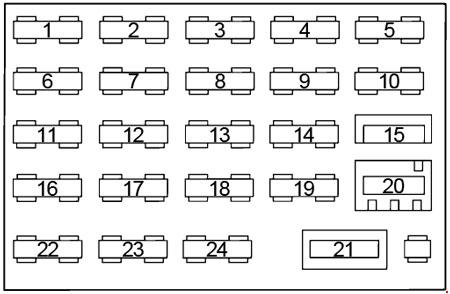
| No. | A | Circuit Protected |
| 1 | 5 | Instrument Lights |
| 2 | 10 | ECM, Multiport Fuel Injection (’93-’94) |
| 3 | – | ’90-’93: – |
| 10 | ’94: Automatic Door Unlock | |
| 4 | 15 | Cigarette Lighter, Glove Box Light (’93), Interior Lights (’94) |
| 5 | – | – |
| 6 | 10 | Radio/Audio Systems |
| 7 | 10 | Gauges, Audio Warning, Cluster Telltales (’90-’93), TCC (’90-’93), Rear Defogger Relay, Brake/Transaxle Shift Interlock (’93-’94), Multi-Port Fuel Injection (’93-’94), Instrument Panel (’94) |
| 8 | – | – |
| 9 | 15 | Parking Lights, Turn Lights |
| 10 | 25 | ’90-’93: HVAC, Heater & A/C Power, ABS, Daytime Running Lights (’93) |
| 25 | ’94: ABS, Coolant Fan, HVAC, Daytime Running Lights, Starter & Charging System | |
| 11 | 25 | Wiper/Washer |
| 12 | 10 | Fuel Pump, Injectors |
| 13 | 10 | Radio/Audio Systems, Clock |
| 14 | 20 | ’90-’93: Interior Lights, Glove Box Light, Horn, Power Locks, Audible Warning (’93), Remote Liftgate Release (’93), Check Oil Light (’93) |
| 15 | ’94: Audible Warning, Automatic Door Locks, Convertible Top, Horn, Instrument Panel, Interior Lights, Tailgate Release | |
| 15 | 30 | Circuit breaker: Power Window, Convertible Top |
| 16 | 10 | Cruise Control |
| 17 | 15 | Back-Up Lights, Turn Signal (Exterior Lights) |
| 18 | 20 | Stoplights, Hazard Flashers, Brake Transaxle Shift Interlock (BTSI (’94)) |
| 19 | 20 | Flash-To-Pass (Headlights) |
| 20 | 30 | Circuit breaker: Automatic Door Locks, Rear Defogger |
| 21 | 20 | Circuit breaker: Headlight, Daytime Running Lights (’94) |
| 22 | – | – |
| 23 | – | – |
| 24 | – | – |
Conclusion
For owners and enthusiasts of classic Chevrolet Cavalier 1990-1994, understanding the fuse box and relay systems is essential for vehicle maintenance. Regular inspection and maintenance of these components helped ensure the vehicle’s longevity and reliability, preserving its status as a symbol of Chevrolet’s craftsmanship and innovation in the automotive industry during that era.